


Visual Guide to Crochet Doll Making
Crochet Doll Making with Simple Techniques
In the world of handicrafts, crochet doll making is one of the most popular and fascinating activities. This art not only allows individuals to create beautiful and unique dolls, but it also enhances creative skills and precision. In this article from SelMagz, we will review the steps and key points for crochet doll making so that you too can create delightful dolls using simple techniques. Join us as we step into the world of colors and textures.

Crochet Doll Models
Crochet Doll Making Equipment
To make this crochet doll, you will need the following:
50 grams of white cotton yarn
50 grams of blue cotton yarn
100 grams of natural merino wool
50 grams of light purple merino wool
3.5 mm crochet hook
Safety eyes
Thread scissors
Cotton or stuffing material for toys
Needle and thread
Sewing markers
Sewing markers are very helpful for easily tracking the crochet doll pattern. If you don’t have sewing markers, you can use small pieces of yarn as a substitute. I used 100% cotton yarn from the Sirdar brand, but you can choose any brand you like. Just make sure the yarns have the same weight if you are using the same size hook.

Suitable Yarn for Doll Making
Steps for Crochet Doll Making
Create a magic ring with 6 stitches (6 stitches).
In each stitch, make two single crochets (2 single crochets in each stitch = 12 stitches).
In the first stitch, make one single crochet, then in the next stitch two single crochets (one single crochet, two single crochets). Repeat this for the entire round (18 stitches).
(2 single crochets, two single crochets in the next stitch). Repeat this for the entire round (24 stitches).
(3 single crochets, two single crochets in the next stitch). Repeat this for the entire round (30 stitches).
(4 single crochets, two single crochets in the next stitch). Repeat this for the entire round (36 stitches).
(5 single crochets, two single crochets in the next stitch). Repeat this for the entire round (42 stitches).
(6 single crochets, two single crochets in the next stitch). Repeat this for the entire round (48 stitches). Rows 9 to 23: In each stitch, make one single crochet (48 stitches).
In the next 6 stitches make one single crochet, then pair two stitches together (6 single crochets, two single crochets together). Repeat this for the entire round (42 stitches).
(5 single crochets, pair two stitches together). Repeat this for the entire round (36 stitches). This step is perfect to attach safety eyes to the doll.
(4 single crochets, pair two stitches together). Repeat this for the entire round (30 stitches).
(3 single crochets, pair two stitches together). Repeat this for the entire round (24 stitches). Now you can attach the doll’s hair. Take the red yarn and using the needle, thread it through the center of the head. Adjust the lengths of the strands as desired and tie each strand to the previous one.
(2 single crochets, pair two stitches together). Repeat this for the entire round (18 stitches). Stuff the doll’s head with fiber and leave some space to continue the crochet rounds.

Crochet Doll

Necessary Tools for Doll Making
Instructions for Crocheting the Doll’s Body
Row 29: (1 single crochet, 2 single crochets paired together). Repeat this pattern until the end of the row. (12 stitches).
Rows 30 to 31: Make one single crochet in each stitch.
The doll’s neck is now complete. You will now increase the shoulder width and body using a circular (spiral) pattern.

Crochet Techniques
Crocheting the Doll’s Arms
Row 1: Create a magic ring and make 6 single crochets in the ring. (6 stitches).
Row 2: In each stitch, make 2 single crochets to double the stitch count. (12 stitches).
Row 3: Make 1 single crochet in each stitch. (12 stitches).
Row 4: (1 single crochet, 2 single crochets in the next stitch) repeat until the end of the row. (18 stitches).
This instruction is for starting the hand and arm of the doll. The doll’s arms will be crocheted continuously and spirally; in the end, you will need 2 arms.
Row 32: (1 single crochet, 2 single crochets in one stitch) repeat this pattern until the end of the row. (18 stitches).
Row 33: (1 single crochet in 2 stitches together, 2 single crochets in one stitch) repeat this pattern until the end of the row. (24 stitches).
Row 34: (1 single crochet in 3 stitches together, 2 single crochets in one stitch) repeat this pattern until the end of the row. (30 stitches).
Row 35: (1 single crochet in 4 stitches together, 2 single crochets in one stitch) repeat this pattern until the end of the row. (36 stitches).
Row 36: (1 single crochet in 5 stitches together, 2 single crochets in one stitch) repeat this pattern until the end of the row. (42 stitches).
Rows 37 to 47: Make one single crochet in each stitch. (42 stitches).
Row 48: (1 single crochet in 5 stitches together (1sc x 5) and 2 single crochets paired together) repeat this pattern until the end of the row. (36 stitches).
Rows 49 to 58: Make one single crochet in each stitch. (36 stitches).
Row 59: (1 single crochet in 4 stitches together, 2 single crochets paired together) repeat this pattern until the end of the row. (30 stitches).
Row 60: (1 single crochet in 3 stitches together, 2 single crochets paired together) repeat this pattern until the end of the row. (24 stitches).
Row 61: (1 single crochet in 2 stitches together, 2 single crochets paired together) repeat this pattern until the end of the row. (18 stitches).

Crocheting Felt Dolls and Crochet Dolls
Stuff the doll’s body and neck with fiberfill or suitable filling material, but leave space for continued crocheting.
Row 62: (1 single crochet in 1 stitch, 2 single crochets paired together) repeat this pattern until the end of the row. (12 stitches).
Row 63: (2 single crochets paired together) repeat this pattern until the end of the row. (6 stitches).
Continue by making two single crochets paired together to close the doll’s body. Leave the yarn end a little long so you can attach the legs to the doll.

Crochet Doll Making for Beginners
Crochet Doll Shoes
For this doll, you need to crochet two boots. Start with the toes of the boot using a 3.5 mm hook and purple yarn, continuing in a spiral.
Create a magic ring with 6 stitches. (6 stitches).
In each stitch, make 2 single crochets. (12 stitches).
In the first stitch make one single crochet and in the next stitch two single crochets. (1 single crochet, 2 single crochets) repeat this pattern until the end of the row. (18 stitches).
Rows 4 to 7: Make one single crochet in each stitch. (18 stitches).
In the next 9 stitches make 1 slip stitch, then in the next 9 stitches make one single crochet. (18 stitches).
Make two chains, turn the boot, and make one single crochet in the remaining 8 single crochets.
Repeat the previous step.
Use a slip stitch to connect one side of the row to the other to form the back of the boot. Now, you will crochet the upper parts of the boot.
Make two chains, then crochet 4 single crochets along the first edge. Then crochet around the top edge for a total of 14 stitches.
Make two chains and crochet one single crochet in each stitch. Connect at the end of the row with a slip stitch.
Repeat the previous step. At the end of row 16, change the yarn color to white.
Make one single crochet in each stitch, finish off the yarn, and weave in any loose ends after completing your work.
These boots easily slip on the doll’s feet, so there’s no need to leave yarn for further sewing.
You will need to crochet the legs of the doll. Using a 3.5 mm hook and bright orange yarn, continue in a spiral.
Create a magic ring with 6 stitches (6 stitches).
In each stitch, make 2 single crochets (12 stitches).
Rows 3 to 28: Make one single crochet in each stitch (18 stitches).
At the end of row 28, attach the yarn and leave the end for sewing. Stuff the legs with fiber and place them into the boots.
How to Connect the Parts of the Crochet Doll
To connect different parts of the doll before crocheting clothes, you must assemble the doll. This ensures the sizes adjust according to the type of yarn and how tight your crochet is.
To attach the arms, first sew the ends, then connect them to the body at shoulder level. Ensure the palms are facing forward and the arms are slightly angled forward, making the doll appear ready to hug you.
To attach the legs, keep them rounded and in position. If you want the crochet doll to stand, make sure the legs are filled with fiber as much as possible.

Creative Crochet Doll Designs
Crochet Doll Clothing
Start crocheting the doll’s dress using a 3.5 mm hook and white cotton yarn.

Important Tips for Doll Making
Doll Clothing Pattern
Make a chain of 40 stitches and connect it into a ring with a slip stitch. Change the yarn color to blue.
Make two chains and crochet one half double crochet in each stitch. Connect with a slip stitch.
Make two chains, in the first 9 stitches crochet a half double crochet, in the next 2 stitches crochet two half double crochets, then in the next 19 stitches crochet one half double crochet. In the next 2 stitches crochet two half double crochets, then crochet one half double crochet in each stitch until the end of the row. Connect with a slip stitch.
Make two chains, in the first 10 stitches crochet one half double crochet, in the next 2 stitches crochet two half double crochets, and in the next 21 stitches crochet one half double crochet. In the next 2 stitches crochet two half double crochets, and then crochet one half double crochet in each stitch until the end of the row. Connect with a slip stitch and change the yarn color to white.
Make a chain, crochet one slip stitch in each stitch, and connect with a slip stitch.
Finish off the yarn and weave it inside the dress body. The dress collar is now complete, and you should finish the remainder of the dress. Begin crocheting the front and back parts separately, then connect them.

Crochet Doll Making
Place the collar on your crochet doll and mark the points where the arms connect to the shoulders. For my doll, this number is 16 stitches in the front and 13 stitches in the back. Check this number for your doll so you can continue.
Adjusting Tension and Color
The tension of your stitches and the yarn brands you choose may give you slightly different sizes. Using blue yarn and a 3.5 mm hook, remove the collar and turn it to the back. Attach the yarn to the collar and work through the back stitches.
Insert your hook into the back loop of a stitch close to the armpit marker. Make two chains and crochet one half double crochet in each back loop until the next marker.
Make two chains and crochet one half double crochet in each stitch of the row you created.
Make two chains and crochet one half double crochet in each stitch of the row.
At the end of the row, finish off the yarn to secure your place. Repeat rows 6, 7, and 8 on the opposite side to connect a small front and back panel. From the end of row 8 of the back panel, attach the yarn and make 5 chains, then connect with a slip stitch to the edge of the front panel. Connect the other sides with 5 chains as well.
Start connecting with a slip stitch in each stitch and make two chains. Crochet one half double crochet in each stitch and chain loop to create a continuous circle around the dress.
Make two chains and crochet one half double crochet in each stitch. Connect with a slip stitch.
Make two chains and crochet one half double crochet in each stitch. Connect with a slip stitch and at the end of the row, change the yarn color to white.
Make two chains. *In the next four stitches, crochet one half double crochet, then crochet two half double crochets together. Repeat this pattern until the end of the row. Connect with a slip stitch.
Make two chains, in each stitch crochet one half double crochet. Connect with a slip stitch and change the yarn color to blue.
Make two chains, *in the next four stitches, crochet one half double crochet, then crochet two half double crochets together. Repeat this pattern until the end of the row and connect with a slip stitch.
Make two chains, *in the next five stitches, crochet one half double crochet, then crochet two half double crochets together. Repeat this pattern until the end of the row and connect with a slip stitch.
Make two chains, *in the next six stitches, crochet one half double crochet, then crochet two half double crochets together. Repeat this pattern until the end of the row and connect with a slip stitch.
Make two chains, *in the next seven stitches, crochet one half double crochet, then crochet two half double crochets together. Repeat this pattern until the end of the row and connect with a slip stitch.
In each stitch, crochet one half double crochet and at the end of the row, change the yarn color to white.
Make one slip stitch in each stitch and connect at the end of the row.
To finish your project, ensure all loose yarn ends are sewn into matching rows.

Guide to Crochet Doll Making
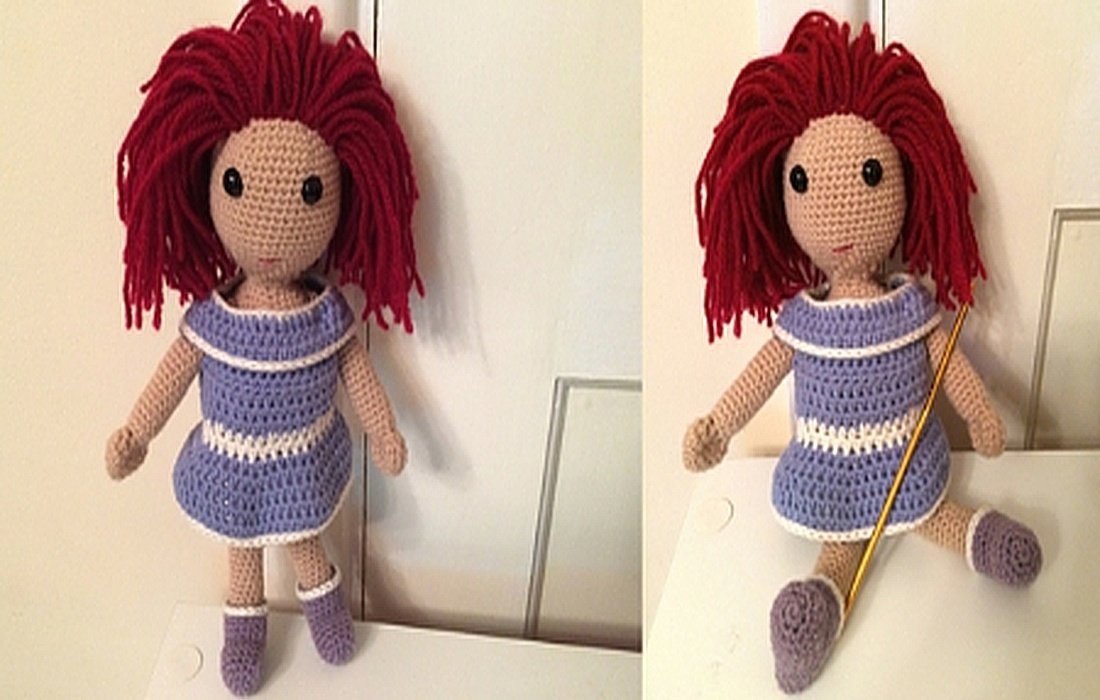
Your Crochet Doll
You can either follow this crochet doll pattern directly or change it based on your preferences. The easiest way to customize it is by changing the yarn colors. You can also crochet different outfits for the doll, such as modifying the length of the dress or sewing different clothes for it.
Final Thoughts
In conclusion, crocheting dolls with crochet yarn is not only a beautiful and entertaining art, but it also provides an opportunity to express creativity and create special and unique gifts. With simple techniques and diverse patterns, anyone can enter the enchanting world of crochet dolls and enjoy creating their own artwork. This activity also allows you to strengthen your crafting skills and to benefit from the peace and satisfaction of working with your hands. So, get inspired by the available ideas and patterns, and start making your own beautiful and delightful dolls. We look forward to seeing your creativity and creations!
Compiled by:SelMagz Home Secrets Section